Djinit
Building djinit: Let’s Stop Wasting Time on Setup
Starting a new Django project is… well, kind of a chore. You love Django, I love Django, but setting up the same old folder structure, configuring DRF, and fighting with CORS headers for the 100th time? Not fun.
That’s why I built djinit. It started as a personal tool just for me, to stop the boring copy-paste cycle and get straight to the code. I’ll share why I built it and how it can make your life easier.
Why I Built It
I built djinit because I was tired. Every time I started a new idea, I had to do the same manual work:
- Split Settings: Creating
base.py,dev.py, andprod.pymanually. - API Setup: Installing Django REST Framework and setting up all the parsers.
- Auth: Wiring up JWT authentication so users can actually log in.
- CORS: Fixing those annoying cross origin errors that block the frontend.
- Docs: Setting up Swagger so I could see my API endpoints.
- Deployment: Writing
Procfileandrequirements.txtfor the server.
I wanted a tool that works like a smart assistant: I answer a few questions, and it builds the foundation.
How It Works
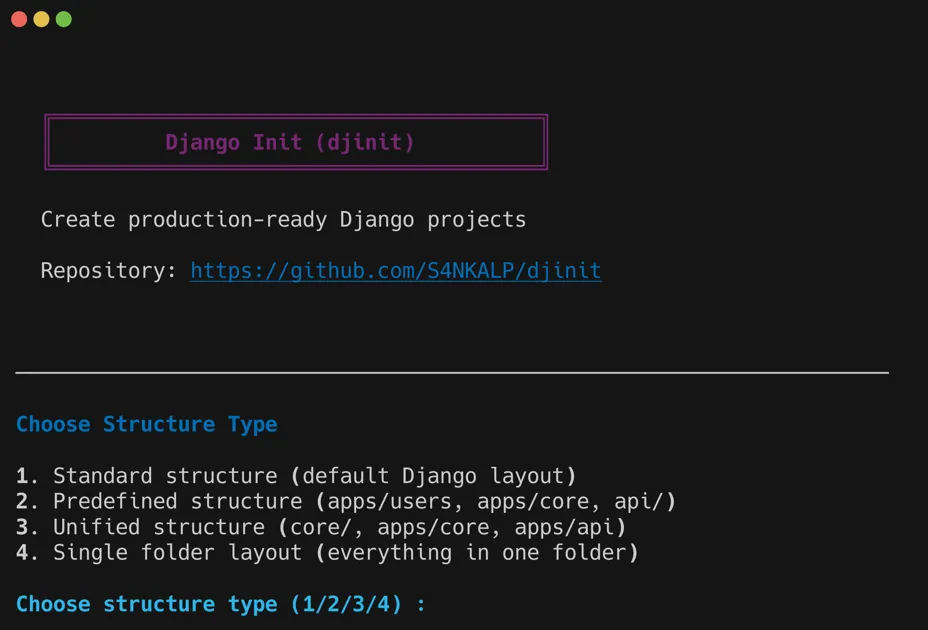
djinit is a Python CLI tool built with typer and rich. You answer a few prompts and it scaffolds the whole project.
When you run it, it asks:
- “What structure?”, “Which database?”, “Want Tailwind, HTMX, or Vite?”, “CI/CD pipeline?”
- It generates all the folders, files, and configuration.
- It sets up dependencies with
uv syncorpip install. - You get a project that runs immediately.
What You Get
When you run djinit setup, you don’t get a blank folder. You get:
- Ready to Go Settings: Development and production settings are already split and configured with
# noqacomments so linters don’t complain. - API Ready: Django REST Framework is installed and set up with JWT authentication.
- Auto Documentation: Swagger UI at
/docs/and ReDoc at/schema/thanks todrf-yasg. - No CORS Headaches: Handled for dev and locked down for production.
- Database Choice: PostgreSQL or MySQL, with
DATABASE_URLor individual env vars. - Production Ready: WhiteNoise for static files, Gunicorn config, and a
Dockerfileincluded. - Dev Tools: A
Justfilewith common commands,rufffor linting,pytestfor testing. - CI/CD: GitHub Actions and/or GitLab CI pipelines generated on request.
Optional Add-ons
Beyond the basics, djinit now asks if you want frontend tooling:
- Tailwind CSS - Scaffolded with
django-tailwind-cli, DaisyUI theme, and Node.js install in Docker. - HTMX -
django-htmxapp and middleware wired into your settings. - Vite -
django-vitewith avite.config.ts, dev/prod mode toggles, and a CI build step.
Pick any combination, or none at all.
How to Use It
Getting started is easy.
A small heads up: I wanted to name the package djinit, but PyPI said that name was taken. Install it as djinitx.
pipx install djinitx

# or

uv tool install djinitx

# or

pip install djinitxOnce installed, you can use the name djinit (or just dj) in your terminal:
djinit setup

# or simply

dj setupPick Your Style
Every project is different, so djinit lets you choose the structure that fits:
- Standard: The classic Django layout we all know.
- Single Folder: Keep it simple. All your apps live in one folder.
- Predefined: Great for bigger projects. It separates
apps/andapi/. - Unified: Clean and minimal. Everything lives under
core/andapps/.
Add Apps
Need to add a users app or a products app? Don’t create folders manually. Just tell djinit:
djinit app users productsIt creates the apps, adds them to INSTALLED_APPS, and wires up the URL includes.
Generate Secret Keys
Need a Django secret key? Don’t search online for random generators:
dj secretThis generates a secure 50 character secret key. Need more keys or a different length?
dj secret --count 5        # Generate 5 keys
dj secret --length 64      # Generate a 64 character key
dj secret --count 3 --length 32 # 3 keys, each 32 charactersImportant Note:
djinitbuilds the house, but you have to put the furniture in it. It sets up the structure and configuration, but it does not write your business logic, models, or views. That fun part is still all yours!
What’s Changed
Since the initial release, djinit has grown a lot:
- Docker Support - Auto-generates a
Dockerfilewith multi-stage builds and Node.js for frontend tools. - Frontend Tooling - Tailwind CSS, HTMX, and Vite integration are now live, not just plans.
- CI/CD Pipelines - GitHub Actions and GitLab CI templates that match your project.
- Dependency Management -
uvnative support withpyproject.tomland[dependency-groups]. - Dev Dependencies -
ruff,pytest, andpytest-djangoincluded out of the box. - API Docs - Switched from
drf-spectaculartodrf-yasg. - Django 6.0 - Supports Django 5.1, 5.2, and 6.0.
Future Plans
I am not done yet! Here is what is on my wishlist:
- Celery Integration: Making background tasks easier to set up.
- Frontend Scaffolding: Generating React or Vue starter projects alongside the Django backend, not just config.
- More Packages: Integrating other popular packages to help you build feature-rich apps.
Give it a try. If it saves you even 10 minutes of configuration hell, it did its job.
Happy Coding!